How to Make Yeast Bread from Scratch [Tips + Techniques]
Every editorial product is independently selected, though we may exist compensated or receive an affiliate committee if yous purchase something through our links. Ratings and prices are accurate and items are in stock as of time of publication.
Here's a step-by-step guide to kneading, shaping and baking yeast breadstuff for the freshest, fluffiest homemade loaves.
Most home bakers don't requite a second idea to whipping up a pan of fudgy brownies or a batch or two of classic cookies. Merely there's ane bake that often gives even seasoned bakers some pause: yeast bread.
Maybe it'southward the yeast (it tin can be tricky!) or all the kneading and waiting that puts some off this broil. But don't shy away from making bread! Once you master the basics, it'due south such a joy to bake—and who doesn't love the smell of freshly broiled bread?
What Is Yeast Bread?
Just put, yeasted breads apply yeast. Pretty straightforward, right? When activated with warm h2o and a fiddling sugar, yeast (a small organism) grows and expels carbon dioxide. This gas gives bread its light, fluffy consistency and the air holes yous see when you slice open a loaf.
Yeast bread, different quick staff of life, likewise requires some kneading to assistance the dough come together and develop gluten. Gluten gives bread the correct texture and helps it concur its shape. Fifty-fifty if you brand gluten-complimentary bread recipes, you'll find that gluten-free breads that use yeast require similar techniques.
How to Make Yeast Breadstuff
All you need to make yeasted bread at home are a few basic ingredients and some patience. We recommend starting with a very elementary recipe before moving on to more than complex breads, like these braided loaves. Our Test Kitchen's become-to is this top-rated white bread recipe, though the methodology here is the same for most easy yeast breadstuff recipes y'all want to attempt.
Ingredients
- 1 package (one/iv ounce) active dry out yeast
- ii-1/4 cups warm water (105-110°F)
- 3 tablespoons sugar plus ane/2 teaspoon sugar
- ane tablespoon common salt
- 2 tablespoons canola oil
- 6-1/iv to half-dozen-3/4 cups bread flour
Tools for Making Bread
- Thermometer : A quick-read thermometer tin can tell you when your water is at the correct temperature for activating yeast. It'southward besides handy for checking the internal temperature of your bakes.
- Proofing container : Make certain you have a vessel large enough for proofing large batches of bread dough. Nosotros similar this container because you can easily see how much the dough has grown.
- Loaf pan : Stock your kitchen with a few loaf pans for bread baking. This non-stick option from our own bakeware line is not bad for easy cleanup.
Directions
Step i: Proof the yeast
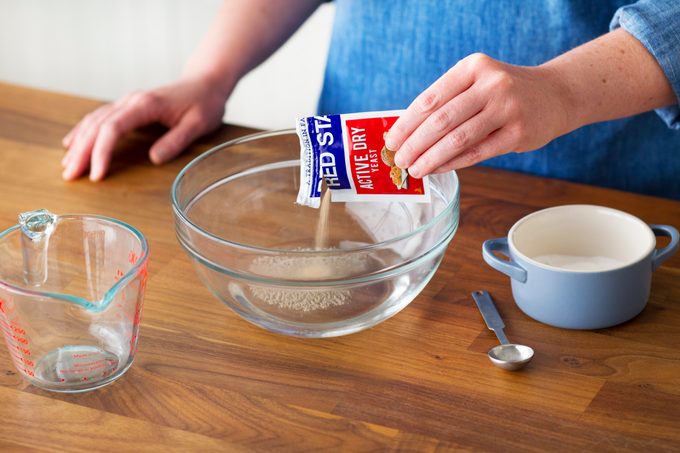
Proofing yeast is the beginning stride to any yeast bread recipe. To do this, add together the package of yeast to the warm water. Stir in a half-teaspoon of sugar. The warm water helps actuate the yeast and the sugar feeds this microorganism. Let the mixture stand for near 5 minutes. When it looks a bit frothy, y'all know your yeast is ready for staff of life baking. (Psst! Acquire how to utilize yeast.)
Editor'south tip: Exist certain that your h2o is the right temperature—aim for 105 to 110ºF. Any hotter and you'll kill the yeast and take to brainstorm again. This is where the quick-read thermometer comes in handy!
Stride 2: Make the bread dough

Adjacent, in the bowl of your stand up mixer (or in a very large mixing bowl), whisk together the remaining sugar, salt and iii cups of flour. Then add the canola oil and yeast mixture and beat until smooth. Yous can use the dough hook of your stand up mixer or a wooden spoon and a lot of elbow grease. Yous tin fifty-fifty use one of these fancy dough whisks to get the job done.
Once the dough is smooth, add together in the remaining flour a half-cup at a time until y'all have a soft dough.
Editor's tip:This recipe calls for bread flour. You tin can find it in the blistering aisle of whatever grocery store. Breadstuff flour has a fleck more gluten in it than traditional all-purpose flour, which makes it ideal for this type of blistering. But if y'all don't have whatever on hand, yous can easily sub in all-purpose flour.
Footstep 3: Knead
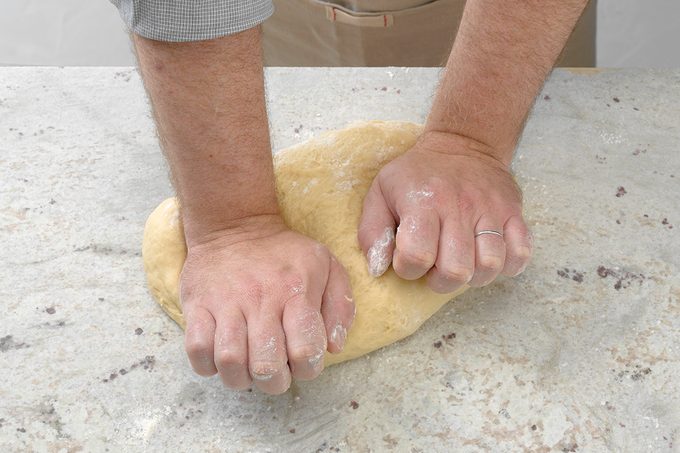
Remove the dough from your mixing bowl and place it on a lightly floured surface similar a countertop or table. Brand certain y'all accept plenty of room to piece of work.
Now roll up your sleeves because information technology's time to knead! Commencement past folding the height of the dough toward you. With your palms, push with a rolling motion abroad from you. Plough the dough a quarter turn and repeat, folding, pushing and turning until the bread dough is smooth and rubberband. If you lot find the dough is really sticky, add a bit more flour to your surface equally needed.
Kneading a batch of dough should accept about 5 to 10 minutes. You lot'll know your bread dough is properly kneaded when you tin can stretch a bit of dough between your fingers and get it thin enough to run into through information technology without it breaking—that's the windowpane test and it means enough gluten has developed in the dough. If the dough tears, keep going.
Editor's tip:When kneading past hand, you don't need to worry about over-kneading your dough. Y'all will tire yourself out long before you overwork information technology. If kneading this way isn't for you, y'all can utilize your stand mixer and a dough hook to knead breadstuff.
Footstep 4: Let the dough rise
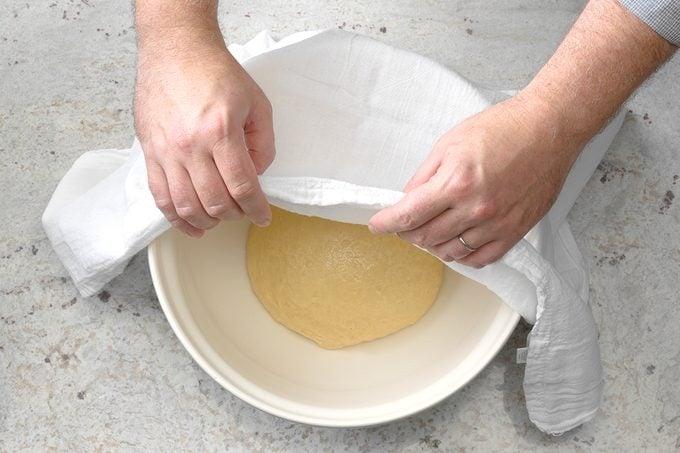
After all that work, it's fourth dimension to let the dough balance while the yeast does its thing. To proof bread dough, grease your container with a bit of oil or cooking spray and cover the dough with a damp cloth. Let information technology sit down in a warm (at least 70º) environment until the dough doubles in size.
Wondering how long information technology takes staff of life to rise? It should have about 90 minutes for this recipe, but the timing can vary depending on factors including the temperature of the room. If your abode is on the cooler side, cheque if your oven has a proofing setting (many newer models do) or follow our tips for proofing breadstuff dough in the common cold.
Editor's tip:Knowing when the bread has doubled in size tin can be tough for new bakers. Information technology may help to take a photo of your dough at the start of the process. Or use a handy proofing container: The geometric shape makes information technology like shooting fish in a barrel to mark where your breadstuff starts (use a dry out-erase marking or mucilaginous note) and then yous can see exactly how much it has grown.
Step five: Dial downwardly and shape

Once your dough has doubled in size, information technology's time to give it a quick check with your fingertips. When you poke the dough, information technology should slowly spring back. If the dough still feels business firm, information technology needs a fleck more fourth dimension to rise.
Side by side, it's time to dial down. That means taking your fist and pressing information technology into your bread dough to release some of the air.
Then remove the dough from its proofing container and divide information technology in half. You can eyeball this if you similar, or utilize a scale to get the proportions verbal.
After dividing the dough, shape each portion into a loaf. Then identify each loaf into a greased loaf pan.
Stride 6: Proof again
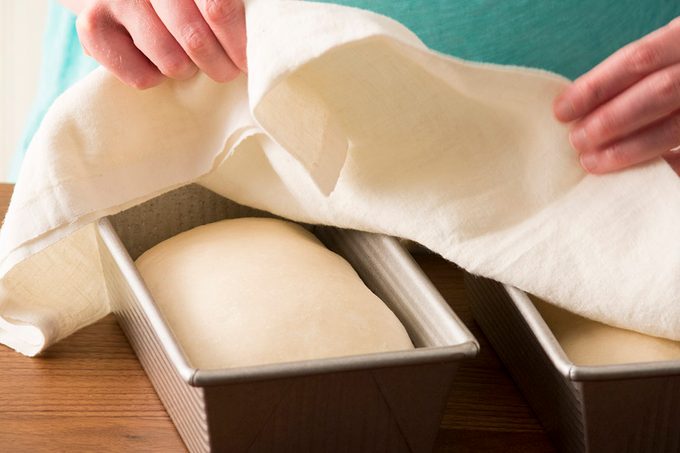
One time shaped and in the pan, it's time to proof the bread for a second time. Just like last time, cover the dough with a towel and identify in a warm, humid function of your kitchen. Allow the staff of life proof and grow for about another lx to 90 minutes until it fills the pans.
Step seven: Broil

Finally, it's fourth dimension to bake! Pop the loaves into a 375º oven and broil for 30 to 35 minutes. The loaves should be gilt brownish. If yous want to exist sure they're broiled through, use your thermometer to check the internal temperature of the bread. Yous're looking for about 185º.
Once baked, remove from the oven and let the pans cool on a wire rack. After 10 minutes, yous tin remove the breadstuff from the pan and allow the loaves absurd completely.
How to Shop Bootleg Bread
The smell of homemade breadstuff is so tempting, we wouldn't be surprised if you lot ate upwards a whole loaf in a day or two. However, if you need to store information technology, the all-time way to store fresh staff of life is by keeping it in a zip-superlative bag at room temperature (don't put information technology in the fridge!).
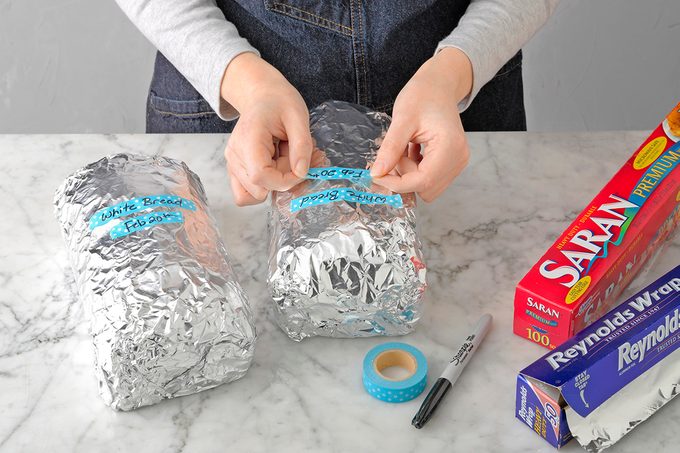
If y'all want to proceed your staff of life for longer, yous can freeze it. Wrap the bread in plastic wrap then in a layer of foil. This will provide extra protection from any freezer burn and forbid the loaf from drying out. Label the staff of life with when it was broiled and try to consume it within vi months of that date.
Yeast Bread Recipes to Brand from Scratch

Sesame Wheat Braids
When I started making this bread, my husband and our 6 children liked it so much that I was blistering every day! I was thrilled when the judges at our county fair gave these braids both a blue ribbon and a all-time of show award! —Nancy Montgomery, Hartville, Ohio

Caramel Pecan Rolls
Soft and sweet, these rolls will get a lip-smacking smiling from anybody. They rise squeamish and high, hold their shape and take a gooey caramel sauce that'south scrumptious. At that place's no better way to start the twenty-four hour period! —Carolyn Buschkamp, Emmetsburg, Iowa

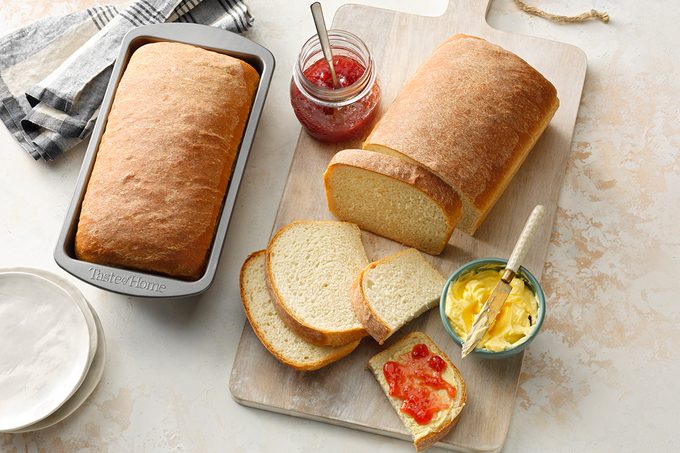
Bones Homemade Staff of life
If you'd like to learn how to bake bread, here'southward a wonderful identify to commencement. This easy white staff of life recipe bakes upwardly deliciously golden brown. There's nothing like the homemade scent wafting through my kitchen as it bakes. —Sandra Anderson, New York, New York (New to breadstuff blistering? Learn how to make yeast bread, pace by pace.)

Oat Dinner Rolls
These soft rolls are out of this world. The addition of oat makes them a petty heartier than other dinner rolls. —Patricia Rutherford, Winchester, Illinois

Apple tree Pull-Apart Bread
For a fun sweet treat that's certain to satisfy, endeavour this recipe. Drizzled with icing, each finger-licking piece has a yummy surprise filling of apples and pecans. Information technology'southward well worth the flake of extra effort. —Carolyn Gregory, Hendersonville, Tennessee

Honey Whole Wheat Rolls
Nearly of the farmers in our area grow wheat, and then this recipe definitely represents my region. I bake these rolls ofttimes, especially when I'm making soup or stew. —Celecia Stoup, Hobart, Oklahoma

Sour Cream Chive Bread
This savory loaf mildly flavored with chives is succulent when served warm with a meal, soup, salad or stew. Information technology too tastes wonderful toasted the next twenty-four hours for breakfast. —Deborah Plank, West Salem, Ohio

Sweet Irish potato Crescents
My family agrees that our Thanksgiving feast would not be complete without these light-as-air crescent rolls. They're a squeamish accompaniment to whatsoever menu. Baking them ever puts me in the vacation spirit. —Rebecca Bailey, Fairbury, Nebraska

Special Cinnamon Rolls
I establish that calculation instant pudding mix to my mom'south succulent gyre recipe actually enhances the season. —Brenda Deveau, Cyr Plt, Maine

Love-Squash Dinner Rolls
These puffy dinner rolls have on rich color when y'all add squash to the dough. Whatever squash multifariousness works. I've even used cooked carrots. —Marcia Whitney, Gainesville, Florida

Swiss Cheese Bread
This bread volition receive rave reviews, whether you serve it as an titbit or with a meal. For real convenience, you tin can make it ahead of time and freeze it! —Karla Boice, Mahtomedi, Minnesota

Soft Buttermilk Dinner Rolls
Warm, buttery dinner rolls are absolutely irresistible. I save fourth dimension and use a stand mixer to make my dough. —Jennifer Patterson, Shoshone, Idaho

Maple Butter Twists
My stepmother passed on the recipe for this delicious yeast coffee cake that'due south shaped into pretty rings. When I make it for friends, they always inquire for seconds. —June Gilliland, Hope, Indiana

Arizona Cornbread
Different other cornbreads, this one uses yeast. With oil and sour foam, this moist, tender loaf has a bit of zip to information technology from the peppers. —Margaret Pache, Mesa, Arizona

Dilly Rolls
These versatile rolls are so welcome served warm alongside whatever dinner. I e'er make a big batch since my family enjoys them subsequently they're cool, too, blimp with a filling similar egg salad or ham salad. —Mary Bickel, Terre Haute, Indiana

Baker's Dozen Yeast Rolls
A yummy dearest-garlic topping turns these easy dinner rolls into something extra special. Try 'em with soups and chili. —Taste of Home Exam Kitchen

Everything Bread
I love to brand bread from scratch and this has become i of our tried-and-true favorites to serve with whatever repast, casual or formal. —Traci Wynne, Denver, Pennsylvania

Old-Fashioned Brown Bread
This chewy, former-fashioned bread boasts a slightly sweetness flavor that will transport you back to the one-time days. —Patricia Donnelly, Kings Landing, New Brunswick

Buttery Chimera Breadstuff
Homemade breadstuff tin can be time-consuming, hard and tricky to make. Simply this fun-to-consume monkey bread, baked in a fluted tube pan, is piece of cake and most foolproof. If I'yard serving it for breakfast, I add some cinnamon and drizzle it with icing. —Pat Stevens, Granbury, Texas

Autumn Sweet Rolls with Cider Glaze
I love cooking with pumpkin because it's versatile, colorful and nutritious. Combining it with chopped apple and cider gives these glazed rolls their autumn entreatment. —Jennifer Coduto, Kent, Ohio

Cranberry Whole Wheat Bagels
The bagel recipes I saw in a magazine inspired me to try creating my own. I've been making them similar crazy ever since! My whole wheat version dotted with cranberries is a favorite. —Tami Kuehl, Loup City, Nebraska

Sunflower Seed & Dearest Wheat Bread
I've tried other bread recipes, but this ane is a staple in our abode. I won $50 in a bake-off with a loaf that I had stored in the freezer. —Mickey Turner, Grants Pass, Oregon

Milk-and-Honey White Bread
My dad has been a wheat farmer all his life and my land is the wheat capital, and then this recipe represents my region and my family well. This bread never lasts as well long at our house. —Kathy McCreary, Goddard, Kansas
'

Can't-Eat-Only-One Cinnamon Rolls
My cinnamon rolls have been known to vanish quickly. One time I dropped off a dozen rolls for my brothers, and they emptied the pan in 10 minutes. —Regina Farmwald, W Farmington, Ohio

Caramel-Pecan Monkey Breadstuff
The kids will get a kick out of pulling off gooey pieces of this delectable monkey breadstuff. It's difficult to resist a caramel-coated treat. —Taste of Home Test Kitchen

Rustic Rye Breadstuff
This gorgeous rye bread has only a bear on of sweetness and the perfect amount of caraway seeds. With a crusty top and firm texture, it holds up well to sandwiches, but a pat of butter will do the job, too. —Holly Wade, Harrisonburg, Virginia

Cranberry Orangish Bagels
Dried cranberries and orange zest add vivid flavour to these scrumptious forenoon treats. Switch upwardly the gustatory modality, if you'd like, by using raisins and cinnamon. —Kristy Reeves, LeRoy, Kansas

Piece of cake Murphy Rolls
After I discovered this recipe, it became a mainstay for me. I brand the dough ahead of time when visitor is coming, and I try to proceed some in the refrigerator to broil for our ranch hands. Leftover mashed potatoes are about certain to go into these rolls. —Jeanette McKinney, Belleview, Missouri

Italian Sweet Bread
This gold brown staff of life offers satisfying sweetness in every piece. The hearty circular loaves rising well and cut beautifully. With an egg wash and a sprinkling of Italian seasoning, the staff of life looks pretty, likewise. —Kim Ooms, Cottage Grove, Minnesota

Overnight Cinnamon Rolls
I like to try unlike fun fillings in these soft rolls, and each 1 is packed with cinnamon season. They are definitely worth the overnight wait. —Chris O'Connell, San Antonio, Texas

Cornmeal Dinner Rolls
A flavorful sidekick to chilies, soups, and stews, these biscuits can also stand up alone with a simple pat of butter and drizzle of honey. —Brynn Rader, Olympia, Washington

Crusty Bootleg Bread
Crackling homemade breadstuff makes an average day extraordinary. Enjoy this beautiful crusty bread recipe as is, or stir in a few favorites like cheese, garlic, herbs and dried fruits. —Megumi Garcia, Milwaukee, Wisconsin

twoscore-Minute Hamburger Buns
Here on our ranch, I cook for iii men who beloved burgers. These fluffy hamburger buns are just right for their big appetites. The buns are and then practiced that I also serve them plain with a repast. —Jessie McKenney, Twodot, Montana

Zucchini Dinner Rolls
Grated squash makes these golden dinner rolls wonderfully tender. Everybody's crazy for these, peculiarly when they're warm from the oven. —Robert Keith, Rochester, Minnesota

Cinnamon Swirl Bread
Your family unit will be impressed with the soft texture and appealing swirls of cinnamon in these lovely breakfast loaves. —Diane Armstrong, Elm Grove, Wisconsin

Pumpkin Pan Rolls
Serve these spicy-sweet pumpkin rolls for dinner—or at any time of day–and go set up to hear a chorus of yums in your kitchen! —Linnea Rein, Topeka, Kansas

Jumbo Jalapeno Cheddar Rolls
Add together some excitement to your cafe with these colorful rolls. The cheddar cheese and jalapeno flavors are mild, but everyone loves the zesty gustatory modality. —Linda Foreman, Locust Grove, Oklahoma

Red Velvet Cinnamon Rolls
Plow a box of red velvet cake mix into this easy dessert—or breakfast! The icing tastes adept and makes a pretty contrast with the rolls. —Erin Wright, Wallace, Kansas

Icebox Rolls
I remember my mom making these rolls virtually every Sat so they'd be ready to bake on Sunday for company or someone simply dropping by. Although they take a little time to gear up, they're actually non all that difficult to make. And there's nothing in the stores that can compare to them! —Jean Fox, Welch, Minnesota

Maple Chimera Bread
This is my family unit's favorite breakfast bread. With a scrumptious topping of maple syrup and brownish sugar, it's the perfect start to a special day.—Hannah Cobb, Owings Mills, Maryland

Dinner Rolls
My family loves the fragrance of these dinner rolls equally they broil, and each person has come up to expect them whenever I make a special meal. Afterwards that meal, these rolls can exist easily reheated and "freshened." Just popular them in the microwave, or put them in a moistened paper bag and then place the handbag in an oven on low rut. —Anna Baker, Blaine, Washington
Source: https://www.tasteofhome.com/article/how-to-make-yeast-bread/
0 Response to "How to Make Yeast Bread from Scratch [Tips + Techniques]"
Postar um comentário